
 The computer fridge hypothesis is a seemingly brilliant idea: store and operate your computer in a fridge, and wave good bye to all heating issues.
However — in 2015, a disappointing video appeared on YouTube: Linus Tech Tips once and for all rejected the computer fridge hypothesis by an experiment showing that refrigerators always loose in thermodynamic battles against modern computers.
The heat dissipated by the personal computer will exceed the heat absorption capacity of the fridge evaporator — causing the ambient temperature in the fridge to rise rather than fall. If we consider the system as a whole, we have a serious self-heating problem, and there is nothing we can do about it.
Or is it?
Cracking The Self-Heating Problem
Pleasant ideas deserve to be treated with respect, right? They should be tried from every angle before being trashed. From first principles, I decided to challenge the rejection of the computer fridge hypothesis by proposing: the ventilated computer fridge hypothesis!
The Ventilated Computer Fridge Hypothesis

The ventilated computer fridge hypothesis is based on the following reasoning: If the fridge is equipped with a balanced ventilation system, most of the heat dissipated by the computer will be transferred out of the fridge, so there will be no self-heating. When the fridge is turned off, the system will simply function as a normal computer cabinet. Now, if we in addition route the in-air stream via the evaporator, the air will be cold when it hits the computer, thus absorbing heat from the computer on the way out of the fridge. See the sketch on the right.
I decided to test the new hypothesis, so I had to build my own computer fridge.
Building a Computer Fridge
I bought a second hand mini-fridge with a glass door from TempTech on eBay as a starting point.
Installing Balanced Ventilation
 I decided to install a simple balanced ventilation system represented by four Corsair ML140 Pro cabinet fans.
While the task of installing four fans in a mini-fridge is not the most pleasant thing a human being can do in the world — it can be done by some laborious drilling on the outside, and heavy angle grinding on the inside.
My friend Øyvind Colliander created a nice template for the drilling part. See the fan hole template below. The trick is to tape a printed template to the fridge wall, and use a punch and a hammer to mark the center of the holes before drilling. For the angle grinding, put on a face mask and cut out four squares on the inside aligned with the holes on the outside.
Result: two fans on the upper back (in-air), and one fan on each side (out-air).


Bypassing the Thermostat & More
In order to get full control of the fridge’s cooling system, I bypassed the internal thermostat and instead installed an Arduino micro controller and an external relay board beneath the back plate on the inside of the fridge. I also permanently installed the Arduino DHT-11 sensor to get ambient temperature and humidity readings. The sensor is placed in the bottom right corner of the fridge. I drilled holes on the backside for 230 VAC power and Ethernet, and installed a power socket, as well as two AC/DC converters (36 VDC & 12 VDC) on the inside.


Lighting and a Retractable Shelf
At this point, the fridge was ready to be tested, but for fun I decided to take the concept just a few steps further… Some lighting is nice, right? And — uh, a motorized retractable shelf for the computer! The latter turned out to be more challenging.
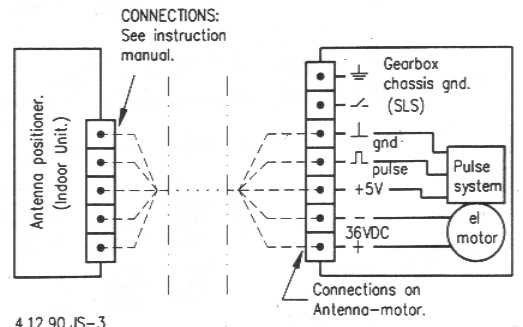
Basically, I used FreeCad to design a rack-and-pinion based retractable shelf. The design consists of three main parts; the rack, an old electric parabola antenna motor with a pinion, and a clamp to fix it to the shelf. Thanks to Andre Böehme for helping out with the toughest part — namely modelling the pinion and a matching rack tooth profile. I used i.materialise to 3D-print the parts. Great service!

 To control the position and direction of retraction of the shelf, I combined two of the relays on the external relay board to achieve a polarity reversal switch.
The parabola antenna motor also has a built-in pulse counter circuit, which can be used to pinpoint its exact angular position. Basically, the circuit sends out short square pulses synchronized with the pinions angular movement. Position control is thus achieved by simply counting pulses with an analog input channel on the Arduino.
See below for a full (sloppy) wiring diagram of the system.

Installing the Computer

I installed the computer hardware on a Lian Li test bench placed on top of the retractable shelf in the fridge.
Computer Specifications:
- ASUS ROG STRIX B450-E GAMING Motherboard
- AMD Ryzen 5 2600 Wraith Stealth
- Corsair Vengeance LPX DDR4-3200 C16 BK DC – 32GB
- Samsung 970 EVO Plus SSD M.2 2280 – 500GB
- ASUS GeForce RTX 2080 Ti ROG STRIX OC – 11GB GDDR6 RAM
- Corsair 1000W PSU
Computer Fridge Code
The software I developed for the computer fridge basically consists of three parts;
- An embedded Arduino back-end coded in C (deepfridge.ino)
- A Python CLI frond-end to control the whole system (deepfridge.py)

- A set of Python test scripts with data logging functionality to conduct experiments (tests/deepfridge_logger_test*.py)
The code is available on Github: https://github.com/gknilsen/computer_fridge
The Computer Fridge Put at Test
Let’s run a series of tests to see if the computer fridge works. We will use the test scripts tests/deepfridge_logger_test*.py included in the Github repository. The test scripts log the following parameters to CSV files;
- Fridge temperature (by deepfridge.ino / Arduino DHT-11 sensor)
- Fridge humidity (by deepfridge.ino / Arduino DHT-11 sensor)
- CPU temperature (by calls to lmsensors / integrated CPU thermistor)
- CPU utilization (by calls to cpu_usage.sh which is based on calls to top)
- GPU temperature (by calls to nvidia-smi / integrated GPU thermistor)
- GPU utilization (by calls to nvidia-smi)
Some of the tests put the CPU and/or GPU to maximum utilization under certain periods — this is achieved by calls to stress and gpu-burn.
Test #1 — Computer CPU & GPU at Idle with Cooling
Description: The computer CPU & GPU is left at idle. First run for 5 minutes when the compressor is OFF to get a baseline, then the compressor is turned ON, and the logging continues for 55 minutes. Total test time is 1 hour (3600 seconds).
Test script: tests/deepfridge_logger_test1.py
Log file: tests/test1.csv
Result:

Conclusion: Running the compressor for about an hour results in a CPU & GPU temperature drop of 5 degrees Celsius, when the computer is at idle. Also the ambient fridge temperature is reduced by 5 degrees Celsius.
Test #2 — Computer CPU at Maximum Utilization without Cooling
Description: The computer CPU is left at idle the first 5 minutes, and the compressor is OFF, to get a baseline. Then the computer CPU is put on maximum utilization for 5 minutes. The computer CPU is then left at idle for 5 minutes more minutes. Total test time is 15 minutes (900 seconds).
Test script: deepfridge_logger_test2.py
Log file: tests/test2.csv
Result:

Conclusion: Peak CPU temperature under max utilization is at 53.7 degrees Celsius.
Test #3 — Computer CPU at Maximum Utilization with Cooling
Description: The compressor is set ON, and the computer is left at idle the first 45 minutes. Then the computer CPU is put at maximum load for 5 minutes, followed by 10 more minutes at idle. Total test time is 60 minutes (3600 seconds).
Test script: deepfridge_logger_test3.py
Log file: tests/test3.csv
Result:

Conclusion: With constant cooling for about one hour & max CPU utilization for 5 minutes, again the CPU temperature is reduced by 5 degrees Celsius. Also the ambient fridge temperature is reduced by 5 degrees Celsius.
Test #4 — Computer GPU at Maximum Utilization without Cooling
Description: The computer GPU is left at idle the first 5 minutes, and the compressor is OFF, to get a baseline. Then the computer GPU is put at maximum utilization for 5 minutes. The computer GPU is then left at idle for 5 minutes more minutes. Total test time is 15 minutes (900 seconds).
Test script: deepfridge_logger_test4.py
Resulting log file: test4.csv
Result:

Conclusion: Peak GPU temperature under max utilization is at 66 degrees Celsius.
Test #5 — Computer GPU at Maximum Utilization with Cooling
Description: The compressor is set ON, and the computer is left at idle the first 45 minutes. Then the computer GPU is put on maximum load for 5 minutes, followed by 10 more minutes at idle. Total test time is 60 minutes (3600 seconds).
Test script: deepfridge_logger_test5.py
Log file: tests/test5.csv
Result:

Conclusion: With constant cooling for about one hour & max GPU utilization for 5 minutes, the GPU temperature is reduced by 3 degrees Celsius. The ambient fridge temperature is reduced by 4 degrees Celsius.
Conclusion
The tests show that there are no signs of self-heating, and that the CPU/GPU temperature drops 3-5 degrees Celsius when the cooling system has been activated for about an hour.
The ventilated computer fridge hypothesis has been confirmed!
However, is a temperature drop of 3-5 degrees Celsius worth the effort? Well, it depends. If you play around with overclocking and want to squeeze the most out of your system, 3-5 degrees Celsius might be enough. But is it really worth the effort? The system complexity is overwhelming, costly and not especially effective in its current state. However, the project was a great learning experience, and it was really fun! I doubt that I will run the cooling system much in its current state on a daily basis though.
There is plenty of room for optimization. In fact, currently I have not tested to see what happens if the cooling system remains activated for a longer period than one hour. Same is true for extended periods of maximum CPU/GPU utilization.
Please leave your thoughts in the comments section below. I am happy to receive ideas which can potentially improve the cooling performance of the system.
