Melted Butter Cocoons – Part I

IMG_20181027_162834
Melted Butter Cocoons

I still remember the intense flavor and juiciness of that thick piece of Sirloin. Crusted in the name of Kona, Bone-In and Aged Dry. It was an exceptional dining experience at the Capitol Grill in Houston, Texas. It was the event that gave me the inspiration for this two-part blog post.

In this first part, I will introduce you to my little home project where I try to dry age Sirloin steaks at home. In part two, we will see the results. When? Well, in about 60 days my friend — when the meat is — say, middle — aged.

Dry Aging TL;DR

Dry aging of meat refers to the process of storing meat over a long period of time in a dry environment. This is different from traditional wet aging, where the meat is kept in a vacuum bag over a shorter period of time. Both ideas aim for increased tenderness, intensified flavor — not to mention the prolonged preservation time, which in fact is a common denominator behind many of the world’s culinary specialties. The Rakfisk of Norway is one golden example of this: trout is kept in a bin with sugar, salt and water. A controlled form of rotting process starts, and you can consume the fish over the course of months. One side effect is some very special taste and — uhm — smell properties! Same is true for many other specialties as well.

Dry aging is rooted in the same bio culinary paradigm as sour dough: you want your bio climate to be meat (or dough) friendly, and develop to the better over time. A good dry aging fridge (or room) can develop to the better over the years. It will be a unique bio climate colored by the natural microbiota in that environment.

Instead of going on to explain all the fancy sides of dry aging, I point you to Jess Pryles blog. Read on and you will learn everything you need to know. You will also notice a crucial “fact”: Dry aging is not for the home chef.

Why?

Because if you slice your meat into individual steaks before you proceed, they will basically come out as cured ham, eventually — dry and hard. Point is not to cure the meat! Original idea is to remove the outer dried layer before cooking and consumption. If you dry age individual steaks, they will be dry all the way through. Traditionally, dry aging calls for whole cuts of meat, and you will loose something like 5-10% from removing that outer dried layer after aging. So, either you go buy that large whole cut of meat, and accept the loss, or you stick to that boring wet aging, is it right?

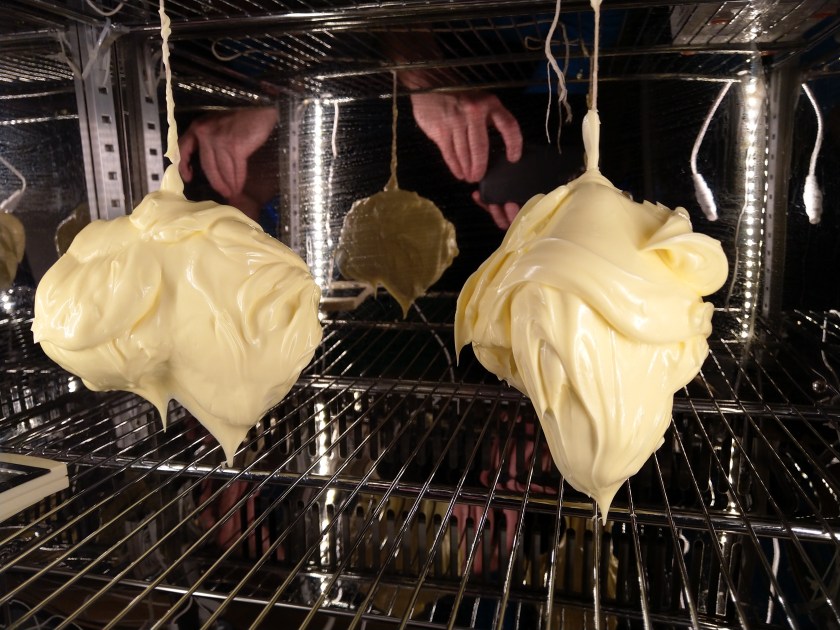
Not quite! It turns out that Casper Stuhr Cobzcyk has developed a new dry aging technique where he first dips his (still) whole cuts of meat in melted butter to form a cocoon protecting the steak from drying out on the surface. It reminds me about cheese waxing!

If you combine the thoughts of Pryles and Stuhr Cobzcyk, I figured it would allow for dry aging of individual steaks at home, since the melted butter cocoon will protect the individual steaks from drying out at the surface, and, hence, you will not need to remove the outer layer nor will they be cured!

Butter probably acts like sort of a “let-moist-out, not-let-oxygen in”-barrier. This in turn, brings up a lot of questions Mr. Stuhr Cobzcyk does not answer. He probably has them, but why should he really share them with the world. For example, what is the optimal thickness of the butter cocoon? Unfortunately, I don’t know all the answers yet.

I decided to put strings around my two steaks, before dipping them in. This allowed me to hang them in the fridge rather than letting them sink into the rack and potentially create a butter mess.

Dry aging started: 27th of October, 2018.

We aim for 60 days, so dry aging stops: 26th of December, 2018.

Nixtamalfunction

Homemade Tortillas have been one of my greatest cooking endeavors of all time. Let me detail the long story that lead me to uncovering a simple yet supreme recipe for real corn Tortillas.

img_0791

I like to iteratively refine recipes and gradually improve them over time. With the goal of reaching perfection, I keep on tweaking only one isolated parameter, and assess the outcome over and over again.

It is always room for improvement, but some constraints usually prevents the home chef from continuing the optimization process indefinitely. The main constraint may be cost. In my case, the cost of importing the right corn to Norway, but mainly the fact that grinding corn fine enough is hard, and as we will see, also requires very special industrial equipment.

Store-bought corn Tortillas in Europe are usually made from a mixture of corn flour and wheat flour. The traditional corn flour is typically made directly from dried sweet corn, which is completely different from the type of corn being a staple in South-America. In fact, the main reason for also adding wheat flour to the corn flour in Europe is to make the dough cohesive (sticks to itself).

The secret to real corn Tortillas is not only the right corn, but also the corn treating process called Nixtamalisation. One common belief is that the technique arose by serendipity on a rainy day when the Aztecs left their corn contaminated with some ashes from the fireplace. Nixtamalisation is the process where dried corn reacts with an alkaline solution (base plus water). Today, calcium hydroxide (Ca(OH)2) is the commonly used base. See the excellent in-depth article by Dave Arnold to learn even more.

The Mexican jargon for calcium hydroxide is “Cal”. For Mexicans (OK, presumably at least for grandmothers) it is about as normal to have a pack of Cal in the closet as it is to have baking-soda. By mixing a small amount of Cal with water and corn in a pot and bringing it to boil, you start the Nixtamalisation process. You then put the lid on the pot and let the corn soak till the day after.

The process has several benefits. First, the flavor is completely transformed (into the better!). Second, the hull of the corn will erode — making it easier digest. And third, it ensures that the dough after grinding will be adhesive and in-cohesive (won’t stick to your fingers).

In Mexico, the corn dough you get from grinding fresh Nixtamal is called Masa (“dough”). Alternatively, the grinded Nixtamal is dried and grinded a second time and becomes Masa Harina (“dough flour”). Maseca is one of the most well known brands of Masa Harina.

Very recently, a few stores have started to offer Masa Harina in Norway and Europe generally. For a long time, GMO (genetically modified organism) restrictions prevented this from happening, at least on a legal basis. Now Gruma, the company behind Maseca, has started to produce from non-GMO corn in Italy making it more widespread.

However, as with most of semi-finished food products, the result is usually inadequate. The quality level not even close to what you can achieve if you make it from scratch. Tortillas from Maseca are simply not authentic. They have a hint of synthetic smell and flavor, and is why you should stay away from them. I believe the artificially short shelflife of Maseca also is a symptom of the same disease.

So, if Maseca is really not an option, should you make your own Nixtamal then? This is where the twist comes in: for the rest of this post I will argue that you should neither attempt to make your own Nixtamal, mainly due to the grinding challenges you will face afterwards. On top of that, you won’t need to import the right type of corn nor get hold of Cal.

If you are still not convinced and want to pursue Nixtamalisation, you can order corn from Rovey Seed Co. But be aware, the shipping cost to Europe will be more than a ten-fold that of the corn. And by the way, you can order Cal on Amazon under the name Mrs. Wages pickling lime — or if you happen to live in Norway and want to go big, get hold of a large bag of Hydratkalk from Franzefoss Minerals sold at Felleskjøpet. In fact, I asked both Franzefoss and Mattilsynet — the Food Safety Authority in Norway — whether Franzefoss’ Cal was graded for food use, but never got any confirmation. However, it has later come to my ears that a large snacks company in Norway had ordered half a ton of Cal from Franzefoss!

Originally, grinding Nixtamal was done by women spending all day on their knees over the Metate y Mano. This stone-carved device – which resembles a small table on short legs – consists of a relatively large working surface (the Metate) and a small hand-held stone (the Mano). To grind, you put a small amount of Nixtamal on the Metate followed by an intensive workout of horizontal rubbing using the Mano.

I first did some experiments with my rather large lava stone mortar and pestle, and quickly realized that this would take forever. Not even with a large Metacorngrinderte would you be able to produce more Masa than enough for a single Tortilla in 15 minutes. Very laborious and time consuming, so I instead got myself a traditional corn grinder. As you can see in the image, it looks just like a meat grinder, but has a small milling stone rather than a blade.

Also using the corn grinder, the process is quite laborious. But this is not the main problem. Even if you grind twice, you won’t manage to grind the Masa fine enough. A very finely grained Masa is required to get a soft and pliable Tortilla. You end up with a quite dry Tortilla because they won’t puff when you cook them. This is the secret, when you flip the Tortilla the second time, bubbles are supposed to form – indicating a two-layered structure. But it won’t happen as long as you don’t have the right grinding equipment. Nixtamalfunction. End of story.

So unless you want to invest in Tortilleria industrial equipment, read on because its time to present the short-cut.

By soaking traditional Tortilla chips in water until they become soggy, and then using achips hand blender you quickly get a surprisingly nice Masa! The only requirement here is that the Tortilla chips are out of best quality and not made from corn flour, but from Nixtamal. The brand shown in the image is well suited and should be available in most countries. If you can find corn  (and not corn flour) on the ingredients list you should be home safe.


Recipe: Real Corn Tortillas from Nixtamal-Based Tortilla Chips


Ingredients:

  • 1 bag of Nixtamal-based Tortilla chips
  • Water
  • Salt (optional)

Equipment:

  • Hand blender
  • Tortilla press (or two flat surfaces, plastic wrapped)
  • Comal (or frying pan)

Instructions:

  1. Put the Tortilla chips in a container and crunch them to small pieces using your fist.
  2. Add a minimum amount of water to the chips. Just enough for all of it to become soggy after a few minutes.
  3. Use a hand blender, and repeatedly run it through the chips mixture until it becomes Masa.
  4. Put plastic wrap on both sides of the Tortilla press
  5. Form a golf ball sized ball of Masa and press flat using the Tortilla press
  6. Cook for ~30 seconds, flip, cook ~30 seconds more. Flip a second time – now cook for only 10-15 seconds. At this point the Tortilla should start to puff up (bubbles formation).

DSC08486

DSC08506

DSC08556

…and, serve!

DSC08587